0からオリジナルwordpressを作成する時に使用するひな形のテーマ。
http://wptemplate.cynosura.jp/
対応済み内容
・基本的なセキュリティ対策
・基本的なテンプレートファイルの整備
構成
■共通
・ヘッダーテンプレート
/themes/cstm-wp/header-content.php
・フッターテンプレート
/themes/cstm-wp/footer-content.php
・CSS
/themes/cstm-wp/common/css/common.css
・JS
/themes/cstm-wp/common/js/common.js
■トップページ
・テンプレート
/themes/cstm-wp/template-parts/content-top.php
・CSS
/themes/cstm-wp/common/css/home.css
・JS
/themes/cstm-wp/common/js/home.js
・リッチスニペット
/themes/cstm-wp/common/js/json-top-wp.js
■下層ページ
・CSS
/themes/cstm-wp/common/css/sub.css
・JS
/themes/cstm-wp/common/js/sub.js
■検索フォーム
/themes/cstm-wp/template-parts/searchform.php
トップページ
http://wp-template.cynosura.jp/
固定ページ(親)
http://wp-template.cynosura.jp/parent-sample/
固定ページ(子)
http://wp-template.cynosura.jp/parent-sample/children-sample/
投稿ページ
http://wp-template.cynosura.jp/uncategorized/2023/03/14/
アーカイブページ
http://wp-template.cynosura.jp/uncategorized/
検索
http://wp-template.cynosura.jp/?s=%E3%83%86%E3%82%B9%E3%83%88
404
http://wp-template.cynosura.jp/parent-samples/
構築手順
wordpressを任意のディレクトリにインストール
http://cnsrwiki.cynosura.jp/wordpress%e5%b0%8e%e5%85%a5%e3%81%ae%e9%9a%9b%e3%81%ae%e5%88%9d%e6%9c%9f%e5%af%be%e5%bf%9c%e3%81%ab%e3%81%a4%e3%81%84%e3%81%a6/#index_id1「All-in-One WP Migration」をインストール
「All-in-One WP Migration」をインストールして有効化。
基本テーマをインポート
※基本テーマは下記サイトから取得
※不要なものはエクスポートしない
http://wp-template.cynosura.jp/wpinstall/cstm-wp-connect.php
basic
ログインID: cynomanagementwp
パスワード: cDBH8v7muhv4JgMt
WP
ログインID: cynowpuser
パスワード: Wc&)J6f!vZiC7Wtzxz

エクスポートするファイルサイズが大きい場合は、
作成されたバックアップファイルの可能性が高いため、
下記ディレクトリのファイルを削除して、再度試してみる。
・/wp-content/backupfile
「wp-config.php」の編集
http://cnsrwiki.cynosura.jp/wordpress%e5%b0%8e%e5%85%a5%e3%81%ae%e9%9a%9b%e3%81%ae%e5%88%9d%e6%9c%9f%e5%af%be%e5%bf%9c%e3%81%ab%e3%81%a4%e3%81%84%e3%81%a6/#index_id6不要なファイルの削除
http://cnsrwiki.cynosura.jp/wordpress%e5%b0%8e%e5%85%a5%e3%81%ae%e9%9a%9b%e3%81%ae%e5%88%9d%e6%9c%9f%e5%af%be%e5%bf%9c%e3%81%ab%e3%81%a4%e3%81%84%e3%81%a6/#index_id7ログイン用URLを置き換え
https://drive.google.com/drive/folders/1caZ72obG8x3JrKKt0ZFEI2nnBY0fbhBB?usp=sharing
「cstm-wp-connect.php」をダウンロード。

http://cnsrwiki.cynosura.jp/wordpress%e5%b0%8e%e5%85%a5%e3%81%ae%e9%9a%9b%e3%81%ae%e5%88%9d%e6%9c%9f%e5%af%be%e5%bf%9c%e3%81%ab%e3%81%a4%e3%81%84%e3%81%a6/#index_id8


新しくパスワードを生成して値を置き換える
パスワード生成サイト
https://www.luft.co.jp/cgi/randam.php
 強度→最強
 文字数→32文字

cstm-wp-connect.php → 「password_hash」の値を上記で生成した値に置き換え
/themes/cstm-wp/inc/component/custom_security.php → 「password_verify」の値を上記で生成した値に置き換え
※両ファイルとも必ず同じ値にする。


「cstm-wp-connect.php」を「wp-login.php」と同じ階層に入れる。
ログインして各種変更
「https://example.com/WPディレクトリ/cstm-wp-connect.php」にアクセスしてログイン
・サイトURLの変更
・「設定>一般」からサイトアドレス(URL)をサイトドメインのみに変更
※対応するサイトによってWPのURL構造は異なると思うので、必要であれば対応する。
このページでは、WordPressをドメイン直下のURLで運用する事を想定した内容となります。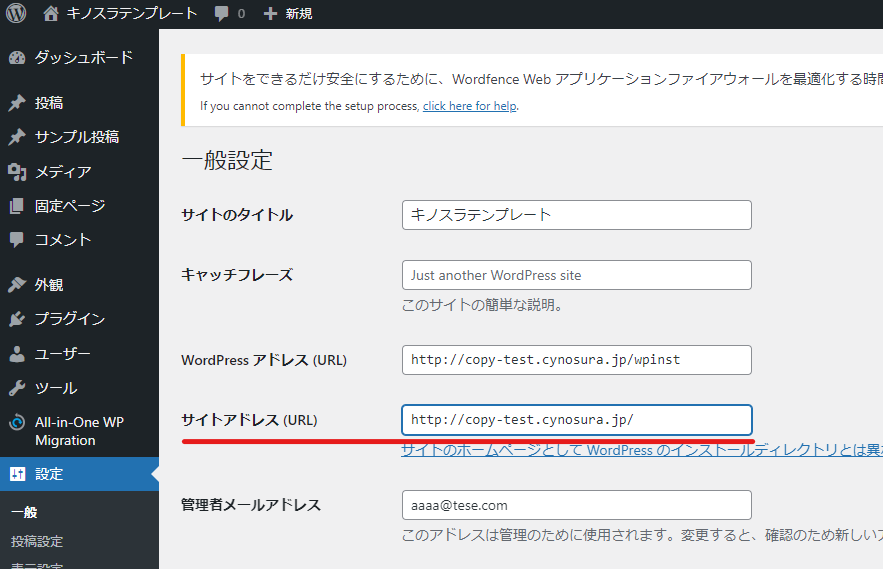
・「.htaccess」の内容を変更してドメイン直下に移動
※複製ではなく移動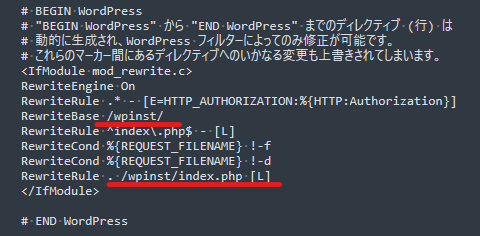
↓
※WPを入れたディレクトリを消す。
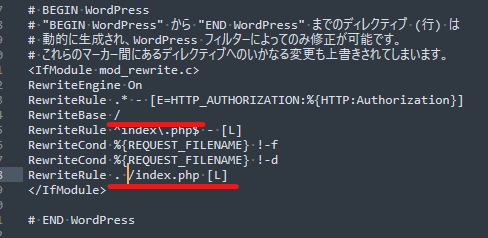
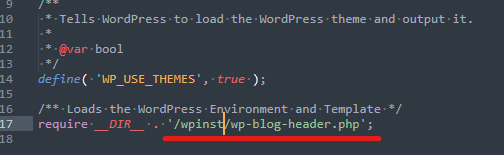
・WPを入れたディレクトリ直下の「index.php」の内容を変更してドメイン直下に複製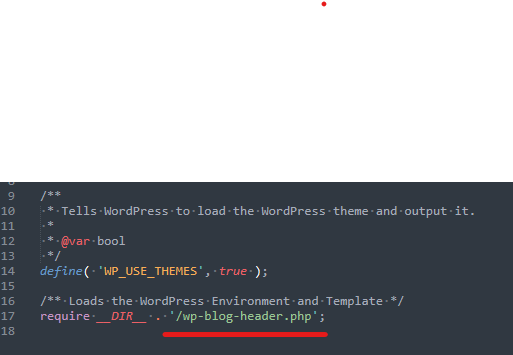
↓
※WPを入れたディレクトリを足す。
・最後に「設定>パーマリンク」に移動
パーマリンクの種類を「カスタム構造」にし、「/%category%/」を含めたリンク構造にして「変更」をクリックして更新する。
WP Multibyte Patchのインストール
・googleリキャプチャの設定(wordefence Securityで対応)
・SITE GUARDの設定
・Wordfence Securityの設定
EWWW Image Optimizerの設定
BackWPupの設定
.htaccessの設定
http://cnsrwiki.cynosura.jp/wordpress%e5%b0%8e%e5%85%a5%e3%81%ae%e9%9a%9b%e3%81%ae%e5%88%9d%e6%9c%9f%e5%af%be%e5%bf%9c%e3%81%ab%e3%81%a4%e3%81%84%e3%81%a6/#index_id10

追加記述の参考ファイル
https://drive.google.com/drive/folders/1caZ72obG8x3JrKKt0ZFEI2nnBY0fbhBB?usp=sharing
→htaccess追記.txt
初期のテーマ調整内容
・トップページのリッチスニペットの変更
themes/cstm-wp/common/js/json-top-wp.js
→「setting」の内容をクライアントに合わせて変更
・no-image画像の変更
/themes/cstm-wp/common/img/base/no-image.jpg
→クライアントのロゴ画像を使用した画像等に変える
・SEO設定
/themes/cstm-wp/inc/component/custom_seo.php
→ロゴ画像やSNSアカウントの設定を変更
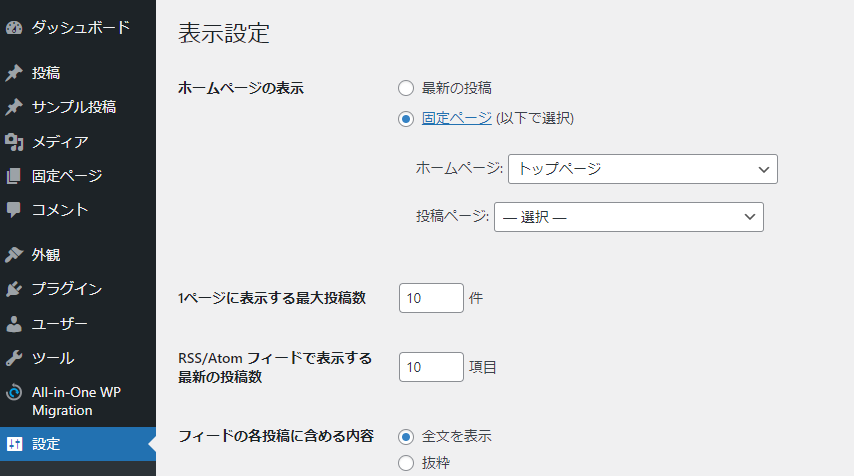
・トップページの設定
固定ページに「top」というスラッグでページを作成。
「設定>表示設定」にてトップページを設定